
Rv Microwave Not Working
The Rv microwave may not be working due to a malfunctioning power supply or a faulty control panel. Now, let’s delve into the possible reasons behind these issues and how to troubleshoot them.
An RV microwave is a convenient appliance for heating up meals or cooking food while on the road. However, like any other electronic device, it may encounter problems. One common issue is when the microwave fails to work altogether. We will explore the potential causes behind a malfunctioning RV microwave and provide troubleshooting steps to help you resolve the problem.
By following these guidelines, you can get your microwave up and running again and enjoy the convenience it offers during your travels.
[ez-toc]
Power Supply Issues
The RV’s microwave might not be working due to power supply issues. Check the power source and connections to resolve the problem with the microwave.
Check The Power Source
Having trouble with your RV microwave? One of the possible culprits might be a power supply issue. Before you panic and consider buying a new microwave, try troubleshooting the power source. Here are a few steps you can take:
- Inspect the power cord for damage: Start by visually inspecting the power cord for any signs of wear and tear. Look for frayed wires or visible damage that could be affecting the electrical connection. If you notice any issues, it’s time to replace the power cord.
- Test the outlet with another appliance: To ensure that the problem isn’t with the outlet itself, try plugging another appliance into the same outlet. This will help you determine if there is a problem with the electrical supply or if it’s isolated to the microwave. If the other appliance works fine, it’s likely that the issue lies within the microwave’s power supply.
- Use a multimeter to check for voltage: If you have access to a multimeter, you can use it to measure the voltage at the outlet. Set the multimeter to the AC voltage setting and place the probes into the slots of the outlet. If the reading is significantly lower than the expected voltage, there may be an issue with the power supply to the outlet. Contact a professional electrician to help resolve the problem.
- Check the circuit breaker or fuse box: Sometimes a tripped circuit breaker or a blown fuse can cause electrical issues. Locate your RV’s circuit breaker or fuse box and check if any circuit breakers have tripped or if any fuses have blown. If you find any, reset the circuit breaker or replace the fuse. Then test the microwave to see if the power issue has been resolved.
By going through these steps, you can pinpoint whether the problem lies with the power supply to your RV microwave. If none of these troubleshooting steps resolve the issue, it may be time to consult a professional technician.
Microwave Door Problems
If your RV microwave is not working, you may be experiencing microwave door problems. These issues can prevent the microwave from properly heating your food and may require professional repair.
The microwave door is an essential component that ensures the safe and efficient operation of your RV microwave. If you’re facing issues with your microwave not working, it’s crucial to check if there are any problems with the door. Here are a few troubleshooting steps to follow:
Verify If The Door Is Properly Closed
- Check if the microwave door closes securely: Make sure the door is closed tightly, with no gaps or misalignment. A poorly closed door can prevent the microwave from functioning properly.
- Look for any signs of damage or warping: Inspect the door for any visible damage, such as cracks or dents. A damaged door might not create a proper seal, resulting in the microwave not working.
- Test the door closure mechanism: Gently press on the door to ensure that it latches properly. If it feels loose or doesn’t close securely, there might be an issue with the door latch mechanism.
Check For Any Obstructions Or Debris Around The Door
- Remove any obstructions: Sometimes, food particles or other debris can get stuck in the door or its surrounding areas. Check for any obstructions and clean them thoroughly to ensure the door closes properly.
- Inspect the door seal: Examine the door seal for any signs of wear or damage. A faulty door seal can prevent the microwave from operating correctly. If you notice any issues, consider replacing the door seal.
Inspect The Door Latch Mechanism For Damage Or Misalignment
- Examine the latch mechanism: The door latch mechanism is responsible for securely closing the microwave door. Inspect it for any signs of damage, such as bent or broken parts. Additionally, ensure that all components are properly aligned.
- Lubricate the latch mechanism: Over time, the latch mechanism can become stiff or sticky, hindering its functionality. Apply a small amount of lubricant (check your microwave’s user manual for recommended lubricants) to ensure smooth operation.
Remember, troubleshooting the door problems can often resolve the issue of a malfunctioning RV microwave. If these steps don’t fix the problem, it might be necessary to consult a professional technician or consider replacing the microwave.
Control Panel Malfunctions
Is your RV microwave giving you trouble? Experience control panel malfunctions? Our blog post identifies common issues and provides solutions for getting your microwave up and running again. Get back to enjoying your meals on the road!
Is your RV microwave acting up? One common issue that many RV owners face is control panel malfunctions. If your control panel is not functioning properly, it can prevent the microwave from working as it should. Here are a few troubleshooting steps you can take to resolve control panel issues and get your microwave back in working order:
Reset The Microwave
If the control panel is frozen or unresponsive, resetting the microwave may help resolve the issue. To reset the microwave, follow these steps:
- Unplug the microwave from the power source.
- Wait for a few minutes.
- Plug the microwave back in.
- Test the control panel to see if it is now functioning properly.
Check For Loose Or Damaged Control Panel Buttons
Sometimes, loose or damaged control panel buttons can cause malfunctions. Follow these steps to check for any issues with the buttons:
- Inspect the control panel buttons for any signs of damage, such as cracks or misalignment.
- Press each button to ensure they are not sticking or unresponsive.
- Check if any buttons are loose or wobbly.
- If you notice any problems, consider replacing the buttons or seeking professional help for repairs.
Test The Control Panel Circuit Board For Issues
If the previous steps didn’t resolve the control panel malfunction, there may be an issue with the circuit board. Here’s how to test it for problems:
- Locate the control panel circuit board, usually located behind the control panel.
- Inspect the circuit board for any visible signs of damage, such as burnt components or loose connections.
- Use a multimeter to test the circuit board for continuity and proper functioning.
- If the circuit board is faulty, consider replacing it or consulting a professional for further assistance.
Remember, control panel malfunctions can be frustrating, but by following these troubleshooting steps, you can identify and address the issue with your RV microwave.
Credit: www.youtube.com
Heating Element Troubles
RV microwave not working? Heating element troubles could be the cause. Don’t let your meals go cold – get your microwave fixed today!
Confirm If The Heating Element Is Functional
If your RV microwave is not heating food properly, there may be an issue with the heating element. To confirm if the heating element is functional, follow these steps:
- Check the power supply: Ensure that the RV is properly connected to a reliable power source and that there are no electrical issues.
- Inspect the control panel: Check if the control panel is displaying any error codes related to the heating element. Refer to the manufacturer’s manual for troubleshooting instructions specific to your RV microwave model.
- Perform a visual inspection: Take a close look at the heating element for any signs of damage, such as burn marks, cracks, or discoloration.
- Test the heating element: Use a multimeter to test the continuity of the heating element. Disconnect the power supply, remove the heating element, and carefully test its resistance. If the reading is significantly higher or lower than the recommended range, it may indicate a faulty element that needs to be replaced.
Inspect The Magnetron For Damage Or Burn Marks
The magnetron is a crucial component of the RV microwave responsible for generating the microwaves that heat your food. If the microwave is not heating properly, it’s important to inspect the magnetron for any damage or burn marks. Here’s what you can do:
- Safety first: Ensure the RV microwave is disconnected from the power source before proceeding with any inspection or repair work.
- Access the magnetron: Depending on your RV microwave model, you may need to remove the external cover or the microwave itself to access the magnetron. Refer to the manufacturer’s manual for guidance.
- Visual examination: Inspect the magnetron for any visible signs of damage, such as burn marks, discoloration, or melted components. Pay close attention to the antenna, which is the most delicate part of the magnetron.
- Test for continuity: Use a multimeter to test the continuity of the magnetron. Disconnect the power supply, remove the magnetron, and test its resistance according to the manufacturer’s specifications. If the reading is significantly different from the recommended range, it may indicate a faulty magnetron that needs replacement.
Check The High Voltage Diode For Continuity
The high voltage diode plays a crucial role in converting the electrical current to the appropriate voltage levels for the microwave’s operation. If the RV microwave is not heating properly, a faulty high voltage diode may be the culprit. Here’s what you need to do:
- Disconnect the power: Before proceeding with any inspection or repair work, ensure that the RV microwave is not connected to the power source.
- Locate the high voltage diode: Depending on the RV microwave model, the high voltage diode may be located near the magnetron. Refer to the manufacturer’s manual to find the exact location.
- Visual inspection: Carefully inspect the high voltage diode for any visible signs of damage, such as burn marks, discoloration, or swelling. Any visible damage indicates a faulty diode that needs to be replaced.
- Test for continuity: Using a multimeter, test the continuity of the high voltage diode according to the manufacturer’s specifications. If there is no continuity, it is a clear indication that the diode is defective and requires replacement.
Remember, if you’re not confident in your troubleshooting abilities or if the issue persists, it’s always best to consult a professional RV technician to ensure the problem is resolved safely and accurately.
Thermal Fuse Failure
The RV’s microwave may not be working due to a thermal fuse failure. This issue can prevent the microwave from turning on and may require professional repair.
RV Microwave Not Working:
Is your RV microwave not working? One possible cause of this issue is a thermal fuse failure. The thermal fuse is a safety device that protects the microwave from overheating. When it blows, the microwave will not function properly. In this section, we will discuss how to locate and test the thermal fuse, replace it if necessary, and investigate potential causes of thermal fuse failure.
Locate And Test The Thermal Fuse:
To locate and test the thermal fuse in your RV microwave, follow these steps:
- Unplug the microwave from the power source and ensure it is completely powered off.
- Remove the microwave from its mounting bracket or cabinet to gain access to the back panel.
- Locate the thermal fuse, which is typically a small, oval-shaped component with two wires attached to it.
- Use a multimeter set to the resistance or continuity setting to test the thermal fuse.
- Place the multimeter’s probes on the thermal fuse’s terminals and check for continuity.
- If the multimeter shows no continuity, the thermal fuse is blown and needs to be replaced.
Replace The Thermal Fuse If It’S Blown:
If you have determined that the thermal fuse is blown, follow these steps to replace it:
- Order a replacement thermal fuse that matches the specifications of the original fuse. This information can usually be found in the microwave’s user manual or on the manufacturer’s website.
- Once you have the replacement fuse, disconnect the wires from the blown fuse by gently pulling them off or removing the connectors.
- Install the new thermal fuse by connecting the wires to the appropriate terminals.
- Secure the thermal fuse back in its original position on the microwave’s back panel.
- Mount the microwave back into its bracket or cabinet.
Investigate And Address Potential Causes Of Thermal Fuse Failure:
To prevent future thermal fuse failures in your RV microwave, consider the following:
- Check the ventilation: Make sure the microwave is properly vented and not obstructed. Poor ventilation can cause the microwave to overheat, leading to thermal fuse failure.
- Check for power surges: Power surges can damage the thermal fuse. Consider using a surge protector or voltage regulator to protect your microwave from sudden power fluctuations.
- Avoid overloading the microwave: Placing heavy or metallic objects inside the microwave can cause it to overheat. Follow the manufacturer’s guidelines for safe use and avoid overloading.
- Regular maintenance: Regularly clean and inspect your microwave for any signs of damage or wear. Address any issues promptly to prevent further problems.
By following these steps and considering potential causes of thermal fuse failure, you can troubleshoot and resolve issues with your RV microwave. Remember to always prioritize safety and consult a professional if needed. Don’t let a blown thermal fuse keep you from enjoying your meals on the go!
Overheating Problems
RV microwave not working? Overheating problems could be the culprit. Stay ahead of the issue with routine maintenance and cleaning to keep your microwave running smoothly on the road.
Microwaves are a convenient and essential appliance in an RV kitchen, allowing you to quickly heat up meals while on the road. However, if your RV microwave is experiencing overheating problems, it can prevent you from enjoying hot meals and snacks on your trips.
In this section, we will explore some possible causes of overheating and how to address them.
Clean The Vents And Ensure Proper Airflow:
- Inspect the vents: Check if the vents on the microwave are clear of any obstructions such as dust, debris, or cooking residue. These blockages can restrict airflow and cause the microwave to overheat.
- Remove the vent cover: If you notice an accumulation of dirt or grease on the vent cover, remove it and clean it thoroughly using mild soap and warm water. Ensure that all parts are completely dry before reinstalling.
- Vacuum the vents: Using a vacuum cleaner with a brush attachment, gently vacuum the vents to remove any dust or debris. This will help maintain proper airflow and prevent overheating.
Test The Microwave’S Fan For Functionality:
- Check the fan blades: Inspect the fan blades for any signs of damage or obstruction. If you notice any issues, such as bent blades or foreign objects, contact a professional for repairs or replacement.
- Test the fan: While the microwave is running, verify if the fan is operating correctly. You should be able to hear the fan running and feel the airflow. If the fan is not functioning or seems weak, it may be a sign of a faulty motor or other internal problems.
Address Any Issues With The Cooling System:
- Inspect the cooling system: Examine the cooling system components, such as the cooling fan and heat sink, for any signs of damage or malfunction. If you notice any issues, consult a professional to diagnose and repair the problem.
- Ensure proper ventilation: Make sure your RV’s microwave is installed in a location with adequate ventilation. The surrounding area should have enough space for air circulation to prevent overheating.
- Consider external factors: External factors like high ambient temperature or extended use can contribute to overheating. If you are using the microwave extensively or operating it in hot weather conditions, take breaks between uses to allow the unit to cool down.
By following these steps to clean and maintain the vents, testing the fan for functionality, and addressing any cooling system issues, you can resolve common overheating problems with your RV microwave. This will ensure that you can continue to enjoy the convenience of quick and hot meals while traveling in your RV.
Circuit Breaker Tripping
If your RV microwave is not working, it could be due to a circuit breaker tripping. This common issue can be resolved by resetting the circuit breaker and ensuring that the power supply is stable.
Determine The Cause Of The Circuit Breaker Tripping
If you’re experiencing issues with your RV microwave not working, one common culprit could be a tripped circuit breaker. In this section, we’ll explore how to identify and resolve circuit breaker tripping problems.
Check For Any Overloaded Circuits
To determine if an overloaded circuit is the cause of your microwave not working, follow these steps:
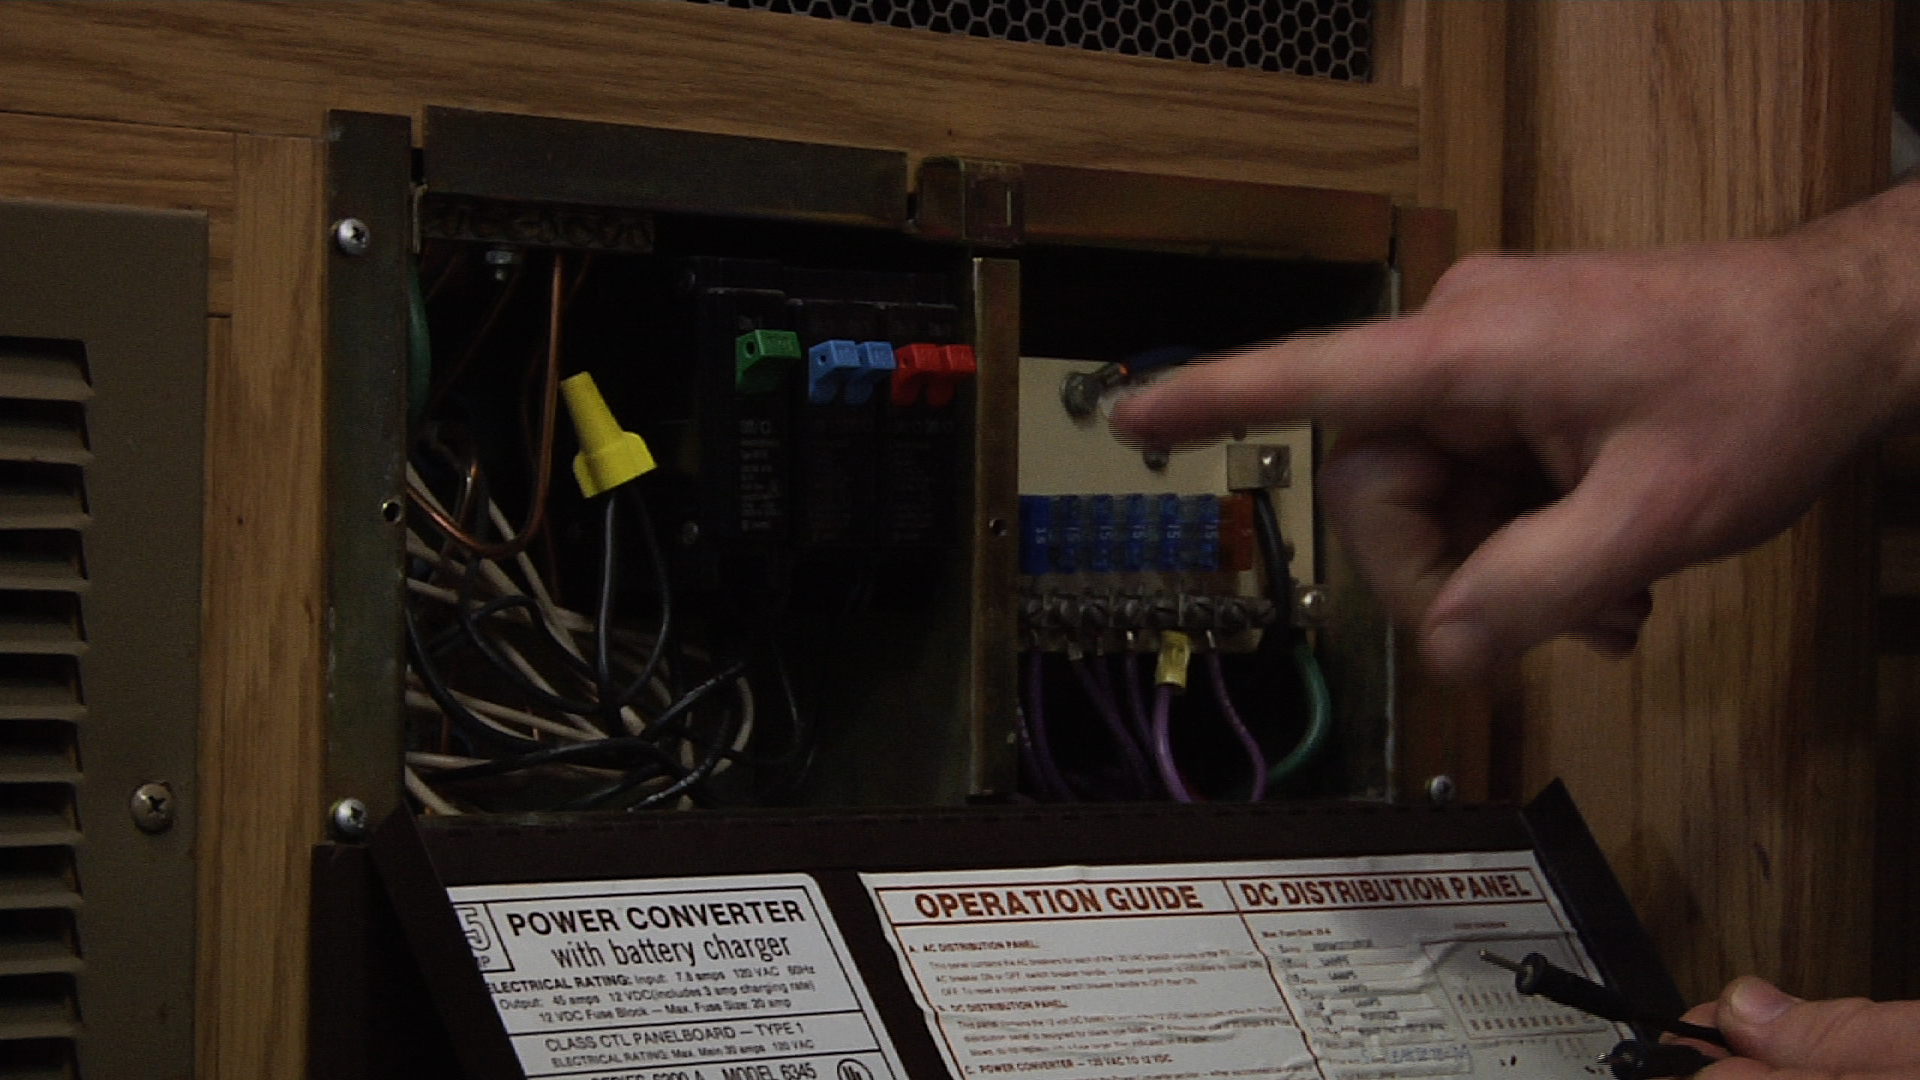
- Examine the circuit breaker panel: Locate the circuit breaker panel in your RV and visually inspect it for any tripped breakers. A tripped breaker will have its switch in a middle position or fully turned off.
- Reset the breaker switch: If you find a tripped breaker, position the switch all the way to the OFF position before resetting it to the ON position. This should restore power to the microwave.
- Distribute electrical load: It’s essential not to overload any single circuit. If the RV’s microwave shares a circuit with other high-powered appliances or devices, consider redistributing the electrical load by connecting them to separate circuits.
Consult A Professional Electrician If The Issue Persists
While the above steps may resolve your circuit breaker tripping issue, there could be more complex electrical problems at play. If your RV microwave continues to malfunction or the circuit breaker keeps tripping, it’s wise to seek the assistance of a professional electrician.
They have the knowledge and expertise to diagnose and fix intricate electrical issues, ensuring the safety and functionality of your RV’s electrical system.
Remember, by following these steps and consulting a professional if needed, you can troubleshoot and fix circuit breaker tripping problems with your RV microwave.
Wiring And Connection Issues
RV microwave not working? Potential wiring and connection issues could be the culprit. Ensure all connections are secure and check for any loose or damaged wiring that may be causing the malfunction.
Inspect The Microwave’S Wiring For Damage Or Loose Connections:
- Check the microwave’s wiring thoroughly to identify any signs of damage or loose connections.
- Look for frayed wires, loose terminals, or any other visible issues that might affect the microwave’s electrical flow.
- If you notice any damaged or frayed wires, they should be replaced immediately to prevent further issues.
- Tighten any loose connections to ensure a secure and uninterrupted power supply to the microwave.
Test The Power Cord And Plug For Any Faults:
- Examine the power cord for any visible damage, such as cuts or exposed wires.
- Plug in the microwave and ensure that it is securely connected to the power source.
- If the power cord appears damaged, it should be replaced with a new one to avoid potential hazards.
- Use a voltage tester to check the plug for any faults, ensuring that it is providing the correct electrical current.
Ensure All Connections Are Secure And Tight Within The Microwave:
- Open up the microwave’s control panel and inspect all internal connections.
- Ensure that all wire connectors are firmly attached without any signs of looseness.
- Tighten any loose connections using the appropriate tools, such as a screwdriver or pliers.
- Double-check that all components are properly connected, including the control board, display panel, and power supply.
By thoroughly inspecting the microwave’s wiring for damage or loose connections, testing the power cord and plug for any faults, and ensuring all connections are secure and tight within the microwave, you can troubleshoot and resolve any wiring and connection issues your RV microwave might be experiencing.
Taking these steps will help ensure safe and proper functionality, allowing you to enjoy convenient cooking while on the road.
Professional Repair Or Replacement
If your RV microwave is not working, it’s crucial to seek professional repair or replacement services to get it back up and running efficiently. Trust an expert to diagnose the issue and provide the best solution for your microwave.
If you are facing issues with your RV microwave and unable to troubleshoot the problem on your own, it may be time to consider professional repair options or even look into replacing the unit altogether. Here are a few points to consider when weighing your options:
Consider Professional Repair Options If Unable To Troubleshoot The Issue
- Consult with a qualified technician or service center: If your attempts to troubleshoot the problem have been unsuccessful, it’s essential to seek the expertise of a professional. They will have the knowledge and experience to diagnose and repair the issue accurately.
- Save time and effort: Professional repair services can save you a considerable amount of time and effort. Instead of spending endless hours trying to fix the problem yourself, a skilled technician can quickly identify the issue and provide an efficient solution.
- Avoid further damage or safety hazards: Attempting to repair complex electrical appliances like microwaves without the necessary expertise can lead to further damage or even pose safety hazards. Hiring a professional ensures that the necessary precautions are taken to avoid any unnecessary risks.
Evaluate The Cost Of Repair Versus Replacement
- Assess repair costs: Before deciding to repair your RV microwave, it’s crucial to consider the cost. Get quotes from different repair service providers to determine if the cost of repair is reasonable and fits within your budget.
- Compare with replacement costs: Evaluate the cost of replacing your RV microwave with a new unit. Consider the features, quality, and warranty provided by different models to make an informed decision.
- Long-term investment: If your microwave is older and has had recurring issues, it might be more cost-effective in the long run to invest in a new unit. Newer models often offer improved features, energy efficiency, and longer warranty periods.
Engaging with qualified technicians or service centers for assistance is crucial in addressing issues with your RV microwave. By considering the cost of repair versus replacement, you can make a well-informed decision that suits your budget and long-term needs.
Frequently Asked Questions For Rv Microwave Not Working
Why Is My Rv Microwave Not Working?
There could be several reasons for your RV microwave not working, including a blown fuse, a malfunctioning control panel, or a faulty power source. It’s best to check the fuse first and then consult a professional if the issue persists.
Conclusion
Troubleshooting a malfunctioning RV microwave can be a straightforward process if you follow these steps. First, check the power source and ensure it is properly connected. Next, inspect the fuse and replace if necessary. Clean the microwave thoroughly and remove any potential blockages.
If these steps don’t resolve the issue, it may be a more complex problem with the circuit board or internal components, in which case professional assistance may be required. It’s important to stay patient and stay safe when dealing with electrical appliances.
By addressing the problem systematically, you can get your RV microwave back in working order and continue enjoying convenient cooking options while on the road. Remember, proper maintenance and regular inspections can also help prevent future issues with your RV microwave.